Performing Common General Searches in DVMAX v8.6 and above
Applies to: DVMAX v8.6 and higher
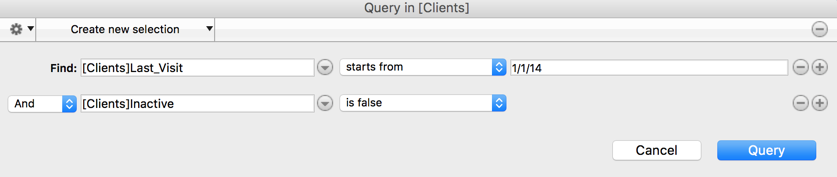
Active Clients Search
This search will result in a list of clients who have had an invoice finished since the date you entered, and are not marked inactive on their client finances screen.
- Click the Clients icon in the command palette. Alternatively, from the Section menu, choose “Clients & Patients”
- Search for Clients, and in the lower dropdown, select General. (Last choice in the list)
- Click the Search button
- In the first pull-down scroll down and click once on Last Visit
- In the second pull-down, click once on “Starts From” (Starts from will search values greater than or equal to the value entered)
- In the Value field, type a date. For example, if you want a list of clients that have come in to the clinic in the last 3 years, you would enter the date for 3 years ago. Enter standard date format: 1/1/14
- Click once on the Add Line button
- Keep the first pull-down value And
- In the second pull-down, click once on Inactive
- In the third pull-down, choose is false
- Click the Query button
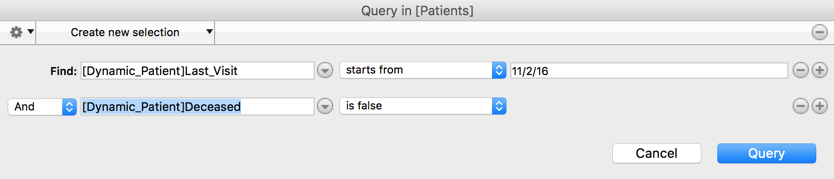
Active Patients Search
This search will result in a list of patients who have been invoiced on or after the date you entered, and are not deceased.
- Click the Patients icon in the command palette. Alternatively, from the Section menu, choose “Clients & Patients” and change the top drop down menu to Patients
- In the lower dropdown, select General. (Last choice in the list)
- Click the Search button
- In the first pull-down, scroll down until you see the Dynamic Patient option

- Click on the arrow to expand the list of options
- Scroll down and click once on Last Visit
- In the second pull-down choose “starts from”
- In the third field, type a date. For example, if you want a list of patients that have come in to the clinic in the last 3 years, you would enter the date for 3 years ago. Enter standard date format: 1/1/13
- Click once on the Plus button
- In the first pull-down on the second line, keep the AND option
- In the second pull-down, scroll down until you see the Dynamic Patient option
- Click on the arrow to expand the list of options
- In the Dynamic_Patient table, find and click once on Deceased
- In the third pull-down, choose is False
- Click the Query button
- From your list of results, click on the "STS" column header
- scroll down, find the first IA and highlight it. Hold down the Shift key and click on the last "IA" you see. Click the Exclude button.
- The number at the top is your total number of active patients.
Note: You can add more search criteria to your search by clicking the Add Line button and choosing another item from the “Available Fields” box. For example, you can select “Doctor_Code” Is equal to “AB” (or whatever Dr Code you choose) to find all patients who came in during that time frame, are not deceased, and have that Dr codes as their current primary provider.
Searching for New Clients
This search results in a list of clients that have a first visit date on their general information page within your specified date range. NOTE: This does not mean the Client was invoiced for any services. If the client was entered "over the phone" and never showed up, they will still show in the list.
- Click the Clients icon in the command palette. Alternatively, from the Section menu, choose “Clients & Patients”
- In the second drop down menu, select New Client (start, end date)
- Type in the date range for which you want to see new clients. Separate your dates with a comma. (1/1/14, 2/1/14)
- Click the Search button.
Searching for New Patients
This search results in a list of patients that have a first visit date within your specified date range. NOTE: This does not mean the patient was invoiced for any services. If the patient was entered "over the phone" and never showed up, they will still show in the list.
- Click the Patients icon in the command palette. Alternatively, from the Section menu, choose “Clients & Patients” and set the top drop down to Patients.
- In the second drop down menu, select New Patient (start, end date)
- Type in the date range for which you want to see new clients. Separate your dates with a comma. (1/1/14, 2/1/14)
- Click the Search button.
Finding Patients that had a certain product sold to them, or a specific service provided.
You can get a list of patients that were prescribed a certain medication, or had a specific service done. For example, all patients that were prescribed Frontline, or Phenobarbital. To do this:
- Click the Patients icon in the command palette. Alternatively, from the Section menu, choose “Clients & Patients” and set the top drop down to Patients.
- In the second drop down menu, select Past Hx (Hx keyword, start, end)
- Type in the keyword (can only be a single word, and must be unique) and the date range.. Separate your word and dates with a comma. (Frontline, 1/1/14, 2/1/14)
- Click the Search button.
- You will be prompted to include or exclude deceased patients. Make your selection.
TO EXPORT THIS LIST
- From your resulting list, Go to the File menu, choose Print
- Select “Custom…” then click “Print”
- A “Quick Report” window will pop up,
- Now start selecting desired information by double clicking on the items in the order you want them to appear:(example)
- Double click First Name
- Double click Last Name
- Double click Address 1
- Double click City
- Double click State
- Double click Zip Code
- Double click Home Phone
- Double click E_Mail_Addr
You do not need to choose these specific fields. Double click each field you want in your report.
- Next, select “File” and hover over “Destination” then select “Disk File”
- Select “File” again and click on “Generate”
- Label as desired and select a destination to save it.
To Convert to Excel Spreadsheet
- Open Excel program
- Click “File” and select “Open”
- Set "type of file" to "all files".
- Select your document and click “Open”
- It may pop up a “Text Import Wizard” window, click “Next” in the first two boxes and “Finish” in the third
- Your newly created Excel spreadsheet should now be open and ready to use as desired
If interested in a recorded webinar session on DVMAX Searches & Queries please click the link below.
https://dvmax.webex.com/dvmax/ldr.php?RCID=a467b0d4e1dd4dd218fcc95e52e54c9e