Epson Printer Configuration for DVMAX Credit Card Processing (Windows)
Operating Systems | Windows |
Versions Affected | DVMAX 7.0.12 and Up |
Step 1: Connecting the printer
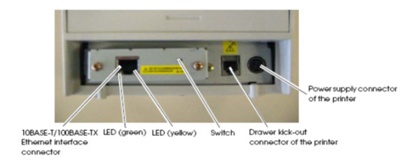
Before installing the printer it is important to be familiar with the back panel of the printer, the card ports, reset switch, and indicator LEDs. The following images represent the TM-T88V and TM-T20.

The following steps should be performed from a workstation and NOT the DVMAX Server computer.
- Make sure the printer is turned off.
- Plug one end of the Ethernet cable into the back of the Epson printer. Connect the cable into the ‘Ethernet Interface Connector” as labeled in the above diagram. You should hear a distinct click when it plugs in.
- Plug the other end of the Ethernet cable directly into your network switch/hub/router. Again, you should hear a distinct click when it plugs in.
- Connect the power supply cable to the printer.
- Turn the printer on.
Before you start it is suggested to perform a self test on the printer by powering down
then holding the feed button while powering back on. The self test can take 10-20 seconds before it starts printing. If a status sheet prints out, then you have completed this step.
Step 2: Download & Install Epson Config Software
Download the Epson IP Configure Tool (Windows): Epson_TMConfig.zip
Once logged in, click on the Downloads tab, locate the Epson-TMConfig installer, and download it to any computer on the same network as your Epson Printer.
Locate and open the Epson-TMConfig installer that was downloaded to your computer. Follow the onscreen directions to complete the installation.
Step 3: Configure Epson Printer on your network
Launch the Epson TMConfig software. It will not create a shortcut on your desktop, so navigate to it by going to:
Start --> Programs --> Epson TMNet WinConfig --> TMNet WinConfig Ver 3.00
The program will open and within 10-20 seconds, you should see the Epson printer appear in the right window with an IP address and a MAC address
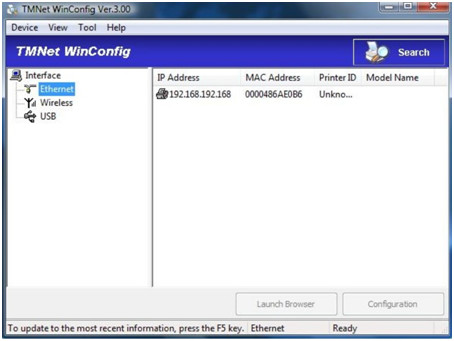
Highlight the printer in the list, and click the Configuration button at the bottom right.
A new window will open, click the TCP/IP tab.
Set the IP Address Setting to Manual
Ensure Set using PING is NOT checked.
Fill in the IP Address with an address that is not in use by any other computer or device on your network. Consult with your network administrator if you are unsure of what should be filled in here.
Fill in the Subnet Mask, and Default Gateway so that it matches your network. You can find out this information by doing the following on your computer:
Open your DOS prompt by clicking START -> RUN, type CMD and press ENTER
A few lines of information will appear in a black box. You will see your cursor blinking at the end of it. Type in the following and hit enter: IPCONFIG
Your screen output should look similar to this:
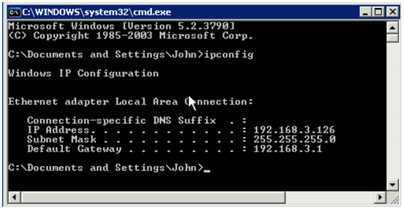
Use the Subnet Mask and Default Gateway listed there for your printer configuration.
Once all settings are filled in on the TCP/IP tab, click OK to continue.
An alert will appear about sending the config data, click Yes.
Another alert will appear asking for a Network password.
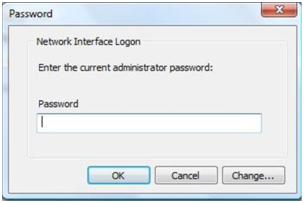
If you use a print server, enter the printer server password in now, otherwise leave the password box blank and click OK.
A progress bar will appear. When finished, a final alert will appear stating there was success.
Click OK to exit the configuration area and Exit the TMNet WinConfig program.
Your Epson Printer is now online in your local network and ready for use with DVMAX Credit Card Processing!