Current Version: DVMAX v8.8
...
| Info | ||
|---|---|---|
| ||
We have implemented a new 4D Write Pro Word Processing module so that the DVMAX Client application could be supported on 64-bit operating systems. With this upgrade, there are a few steps you must take PRIOR to performing the steps below.
(The full checklist can be found here - Pre-Install Checklist for Upgrading to DVMAX v8.8) |
...
- Login to DVMAX Client as the Administrator user.
- From the Section menu, select General Management.
- The General Management dialog opens. Click the Utilities tab.
- Select the Set Passwords & Users and click OK. The Tool Box opens.
- Click the Groups icon on the left side of the window to change to the Groups view.
- Click on the Gear icon at the bottom right and choose Save Users and Groups.
- The Save As dialog will open.
- Select your Desktop, name the file passwords8 and click Save.
- Close the Tool Box by clicking X in the window title bar.
- Close the DVMAX. From the DVMAX menu, select Quit.
Unregister the 4D Service
If the Server application is running as a service, you will need to stop the service, then manually launch DVMAX Server on the local admin account. The rest of the steps that take place within the Server application will be done on the locally launched instance.
All users should be logged off DVMAX Client workstations before proceeding.
To unregister the 4D Service:
- Stop the 4D Service currently running on the server
- Right-click on My Computer
- Choose Manage
- Click on Services and Applications
- Click on Services
- Highlight 4D Server: DVMAX and click Stop
- Launch DVMAX Server application locally
- From the File menu, select Unregister all Server services.
- If Unregister all Server Services is unavailable (i.e. you cannot select it), then the 4D Service has already been unregistered.
- If there are no unregister options are available, the DVMAX Server is still running as a service.
- From the File menu choose Quit.
Backup your DVMAX Data
- On DVMAX Server, go to File -> Backup.
- When the Backup dialog appears, click the Backup button.
- When the Backup is finished, Proceed to Step 3.
...
- Quit DVMAX Server.
- Copy your datafile, typically located in:
Macintosh: Macintosh HD:DVMAXDatabaseFiles:DVMAXDataFolder
Windows: C:/DVMAXDatabaseFiles/DVMAXDataFolder/
...
Disable Log File
- Click on the Maintenance Tab, then click on the Preferences button to configure your backup.
- Click the Configuration tab.
- Uncheck the Use Log File box. A dialog will ask you to confirm. Click Stop (You will reactive the log file after the upgrade)
- Click OK to save the Backup settings
- Go to the DVMAX DataFileFolder and either rename or delete the .Journal file
- Windows typical path: C:/DVMAXDatabasefiles/DVMAXDatafileFolder
- Mac typical path: Documents/DVMAXDatabasefiles/DVMAXDatafileFolder
Backup your DVMAX Data
- On DVMAX Server, go to File -> Backup.
- When the Backup dialog appears, click the Backup button.
- When the Backup is finished, Proceed to Step 3.
If you'd like to make a manual copy of your data instead...
- Quit DVMAX Server.
- Copy your datafile, typically located in:
Macintosh: Macintosh HD:DVMAXDatabaseFiles:DVMAXDataFolder
Windows: C:/DVMAXDatabaseFiles/DVMAXDataFolder/
We highly recommend storing this backup on an external hard drive until you are satisfied with the integrity of the data following the upgrade.
Disable Log File
- Click on the Maintenance Tab, then click on the Preferences button to configure your backup.
- Click the Configuration tab.
- Uncheck the Use Log File box. A dialog will ask you to confirm. Click Stop (You will reactive the log file after the upgrade)
- Click OK to save the Backup settings
- Go to the DVMAX DataFileFolder and either rename or delete the .Journal file
- Windows typical path: C:/DVMAXDatabasefiles/DVMAXDatafileFolder
- Mac typical path: Documents/DVMAXDatabasefiles/DVMAXDatafileFolder
Unregister the 4D Service
If the Server application is running as a service, you will need to stop the service, then manually launch DVMAX Server on the local admin account. The rest of the steps that take place within the Server application will be done on the locally launched instance.
All users should be logged off DVMAX Client workstations before proceeding.
To unregister the 4D Service:
- Stop the 4D Service currently running on the server
- Right-click on My Computer
- Choose Manage
- Click on Services and Applications
- Click on Services
- Highlight 4D Server: DVMAX and click Stop
- Launch DVMAX Server application locally
- From the File menu, select Unregister all Server services.
- If Unregister all Server Services is unavailable (i.e. you cannot select it), then the 4D Service has already been unregistered.
- If there are no unregister options are available, the DVMAX Server is still running as a service.
- From the File menu choose Quit.
Uninstall Existing DVMAX Software
...
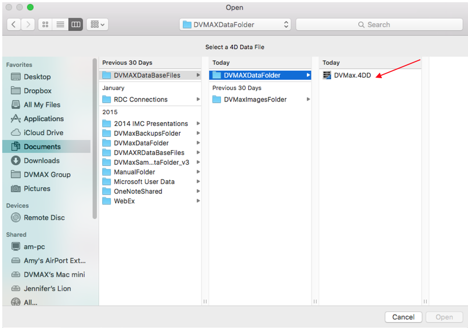
Typical Path on Macintosh: Documents: DVMAXDatabaseFiles:DVMAXDataFolder OR MacintoshHD:DVMAXDatabaseFiles:DVMAXDataFolder
- If you are asked to point to a log file, navigate to the .4BL file in the DVMAXDataFolder and choose to open
- The new DVMAX Server application will open and the data upgrade process will begin. During the upgrade process you will see a resetting window that pops up first. Do not Quit the server during this reset or it will start over.
...
Set DVMAX Server up as a Service (Windows) or Set DVMAX Server to Open at Login (Macintosh)
We recommend running the DVMAX Server application as a service on Windows servers. Complete documentation on how to configure DVMAX Server as a service can be found in our Running DVMAX Server Application as a Service document.
We recommend setting the DVMAX Server application to open at login on Macintosh servers. Complete documentation on how to configure this setting can be found in our Set DVMAX Server Application to Open at Login document.
Upgrade/Update DVMAX Client on Workstations
...
