Finding Classes, Finding Items, and Finding Item Options
Applies to: DVMAX v7.0.12 and higher
Purpose: Finding classes, finding items, and finding item options are a helpful combination of features to help your staff enter medical record notes in a clear, concise, and organized manner. This document defines each feature and describes how to create or edit the configuration.
![]() You must be logged into DVMAX as a user with access to the Patient Codes section of DVMAX to create or edit finding templates.
You must be logged into DVMAX as a user with access to the Patient Codes section of DVMAX to create or edit finding templates.
Editing an existing finding class will change past history of patient record.
Beginning in DVMAX v8.7, you are able to remove items from a finding class without changing past history. Adding finding items will still add those items to any history entries in which the class has been used.
Finding Class
Finding classes are a group of finding items organized to collect specific information about a medical record entry. Finding classes can be created to capture exam findings, manual entry lab results, or discharge instructions, for example.
Creating a New Finding Class
- From the Section pull-down, choose Patient Codes
- Search for Finding Class
- Click Add New
- Choose a Class Code - this is a code that relates to the new finding class name you will be choosing (Example: AnnualExam)
- Choose a Class Name - this is a description of the new finding class you are creating. It is not visible to users or the client. (Example: Annual Physical Exam)
- Click Add Item in the lower right-hand corner of the window to add finding items that relate to the new class.
![]() The finding item must already be created in order for it to be added to this class. You may need to add new finding items (discussed in the next section) before completing your finding class
The finding item must already be created in order for it to be added to this class. You may need to add new finding items (discussed in the next section) before completing your finding class
- Example of a finding class with items added:
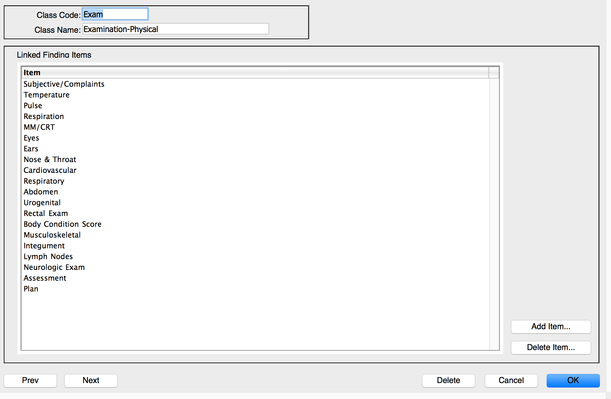
- Click OK to save the new class
![]() After saving the class, you can open it back up and click and drag to move the order of the items
After saving the class, you can open it back up and click and drag to move the order of the items
Finding Items and Finding Item Options
Finding items are the different types of information, observations, or other information you'd like to collect as part of your finding class.
Finding item options are a list of possible choices you can enter for each finding item. Finding item options allow you to quickly choose multiple options, full sentences, or partial phrases instead of typing your findings. You are also able to free-hand type in the finding item box.
Creating a New Finding Item with Finding Item Options
- From the Section pull-down, choose Patient Codes
- Search for Finding Items
- Click Add New
- Choose an Item Name - this is the name you will see displayed in the finding class/patient history.
- Add Units, if applicable. For example, if your finding item is Weight, the units might be lbs. This will save you from having to type lbs each time you enter a value in the weight finding item
- Add Default Note, if applicable. Some examples clinics may choose to have a default note of No Significant Findings in some of their exam finding items, others choose to enter Negative for heartworm test or fecal results.
- Check Support MRE Macros if you would like this finding item to be available when configuring macros. (See Creating Macros for more information on how finding items can be used in Macros)
- Enter WP Formatting options - these settings will format the text of the finding item if the finding item is entered to an open word processing document from the patient history screen. (See insert at the bottom of the document for further instructions on using this feature).
- Click Add Options in the lower right-hand corner of the window to add pick list items for your staff to choose when entering notes in the patient history.
- Enter a Description (the word, phrase, sentence, value, etc) that your staff can choose
- Click OK to add the description and enter additional options
- Click Cancel when you are done adding options.
- Check Suppress commas between selected options if you'd like multiple options to be entered without commas between each choice
- Click OK to save the newly created finding item
![]() You can click and drag to change the order of the finding item options
You can click and drag to change the order of the finding item options
Linking to Medical Record Codes
The final step in using a finding class is to link the class to appropriate medical record codes. By linking the finding class to the medical record code, you are making the class available to staff each time they add the medical record code in a patient history.
Linking a Finding Class to an Individual Medical Record Code
- From the Section pull-down, choose Patient Codes
- Choose Med Rec Codes from the Search for pull-down
- Locate the medical record code by searching for Medical Record Code or Keyword In Description
- Once you have the Medical Record Code General Information open, locate the Finding Class Code: field in the bottom left-hand corner of the window
- Click in the field to display a list of finding classes. Scroll through the list, or begin typing to locate the finding class code.
- Highlight the appropriate finding class code and click OK. The finding class code will be added to the Finding Class Code field
- Click OK to save the changes made to this code
Linking a Finding Class to a Group of Medical Record Codes
- From the Section pull-down, choose Patient Codes
- Choose Med Rec Codes from the Search for pull-down
- Locate the group of medical record codes by searching for Medical Record Code or Keyword In Description. For example, search for Exam in Keyword by Description to find all Exam medical record codes
- From the list of codes, highlight the codes that will have the finding class linked
![]() Hold the Ctrl (PC) or Command (Mac) key to select multiple, non-sequential items from the list. Highlight the first item in a list, hold the Shift key and click the last item on the list, to highlight a sequential list of items.
Hold the Ctrl (PC) or Command (Mac) key to select multiple, non-sequential items from the list. Highlight the first item in a list, hold the Shift key and click the last item on the list, to highlight a sequential list of items.
- From the Med Rec Codes pull-down at the top, choose Mass Change Settings
- Choose the Finding Class Code from the Finding Class pull-down
- Click Set
- Click OK to close the window
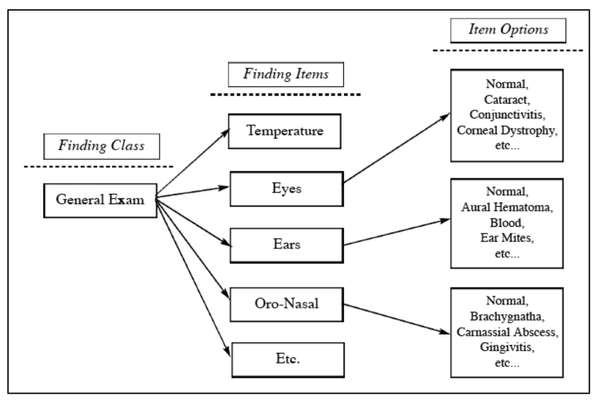
Visual Representation of a Finding Class, Finding Items and Finding Item Options
Using Finding Classes in Patient History
- Open a Patient History
- Click the New MRE icon
- Search for the appropriate Medical Record Code (You can search by code or by using the first few letters of the description)
- Your finding item options will appear on the left-hand side of the new MRE entry window
- Click on the first finding item in the list
- Enter your findings in the box to the right of the items. (Your notes are added to the upper box. A complete MRE preview is displayed in the bottom box).
- Click Finding Options to the right of the finding item entry box to choose options from the pick-list. When selecting options, a • or * will appear next to the selected options.
- Click OK when you are done choosing options
- After all findings are entered for the finding item, click Tab to move to the next finding item
- Click OK to save the Medical Record Entry
DVMAX User Manual - Findings Section
DVMAX offers the option to insert a specific finding item into a word processing document. When the finding item is inserted manually, the font options selected in the finding item configuration are used.
It is also possible to configure word processing documents to automatically insert specific finding items. Review How to insert specific finding item values into a Word Processing document for more information on this word processing configuration.
To Manually Insert a Specific Finding Item into a Word Processing Document
- Open the patient's Word Processing document window
- Put the cursor in the location where the finding item information should be added
- While this window is opened, click on the patient History tab
- Double-click the Medical Record Entry that contains the finding item information you'd like to insert
- Click in the Finding Item
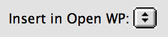
- Click the double arrows next to Insert in Open WP
- Choose Add to WP Document... The specific finding item information will be added to the WP document.