Internal Messenger Overview
- Amy Blanchard
Applies to: DVMAX v8.7 and higher
Purpose: This document will highlight the different screens and features available with the internal messenger feature, as well as discuss our best practice suggestion for successful implementation of the feature.
Opening the Messenger Window
- From the Command Palette, choose Messages

- When the Messages window opens, choose the Current User. This is the user from who the messages will be sent.
Navigating the Messenger Window
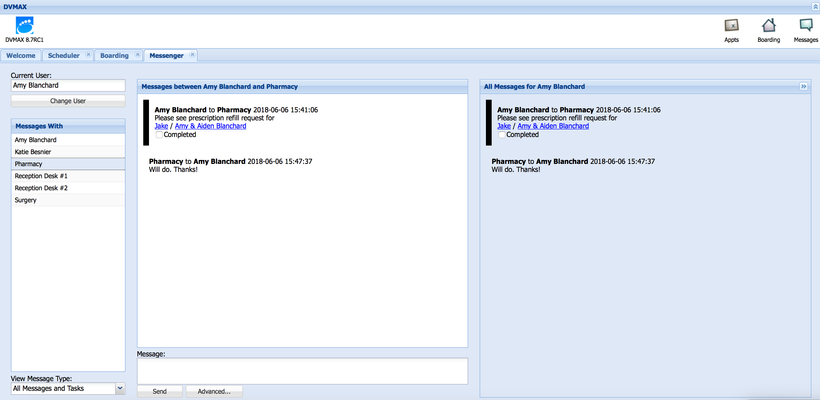
- The icons in the top right-hand corner of the screen will open the corresponding area of the application (Appointments, Boarding, Messages)
- The tabs in the upper left-hand corner will allow you to navigate to a specific section of the application (Appointments, Boarding, Messenger)
- Current User shows the user from who messages will be sent.
- Click the Change User button to change which user is sending messages
- Messages With is the Staff to whom you will be sending a message
 Staff are listed alphabetically by first name.
 - Hold the Control key to select multiple Staff to receive the same message
- View Message Type will show All Messages and Tasks, Messages Only, All Tasks, Or Uncompleted Tasks in the message thread between the current user and the staff with whom you are messaging
- The Messages between box in the middle of the screen shows messages and/or tasks sent between the two staff displayed in the heading
- The Message box is where you will type out the message to send.
- Click Send when you are ready to send to the staff with whom you are messaging
- Click Advanced if you would like to create a task or link to a specific client/patient record (See the Using the Advanced Window section of this article for instructions for using the Advanced window).
- The All Messages for box on the far right shows all messages for the current user. This box can be minimized by clicking the
 icon at the top of the menu bar.
Using the Advanced Window
The Advanced button at the bottom of the Message window is used to create tasks for other staff and/or to link a client/patient record to your message.
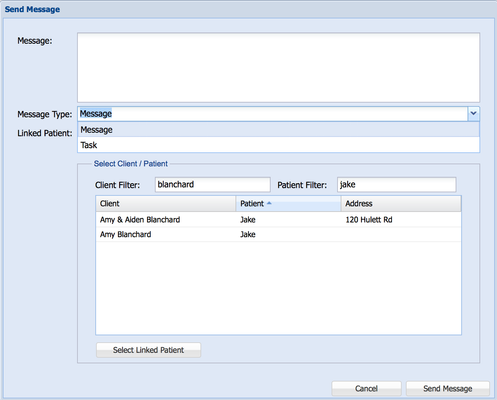
- Message - You can enter your message in this message box. If you've already typed out a message in the previous window, the message will be displayed in this window after clicking Advanced.
- Message Type - From this pull-down, you can choose to send a message or a task. If sending a task, the recipient of the message will see a completed checkbox along with the message.
- Select Client/Patient - Use the client and patient filter to choose the client/patient record to link to your message or task. Highlight the appropriate line and click Select Linked Patient. After clicking the Select Linked Patient button, the selected client/patient record will be listed next to the Linked Patient: field under Message Type.
- Send Message - When you are ready to send the message to the recipient chosen on the previous screen, click Send Message
- Cancel - If you have decided not to send the message or task, click the Cancel button
Completing Tasks
After a task has been completed, check off the Completed box in the Messages between or All Messages section of the Messenger window. Upon a refresh of the screen, the task will be marked completed in both locations.
Message Notification
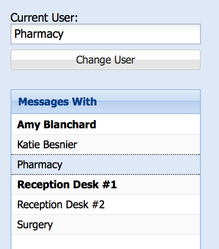
If there are unread messages to the Current User from other users, the other user will be listed in bold in the Messages With section of the Messenger window.
To see unread messages sent to a particular user or workstation in the Messenger window:
- Click on the Messages icon in the command palette
- Choose the user for which you'd like to see the unread messages (Ex: Pharmacy)
- Staff in the Messages With section will be listed in bold if the Pharmacy user has unread messages from any of these staff
- Click on each bold name to read the unread messages.
In this example, Pharmacy has unread messages from Amy Blanchard and Reception Desk #1
Message Colors
There is a color setting in the Staff setup area which will allow you to choose messages sent from staff to be displayed in a specific color. As you send or receive messages, they may be displayed in a specific color box.

Information on setting these colors can be found in the Internal Messenger Setup document.
Getting Started
Now that you've familiarized yourself with each section of the Messenger, you're ready to get started with the feature. If you haven't already done so, it is recommended to review the Internal Messenger Setup documentation to configure your staff records.
Best Practice Recommendation
We have found that hospitals are most successful with the Internal Messenger feature when they create staff records for each workstation in the hospital. With the exception of sending messages and tasks to a specific provider, in most instances, users will want to send a message to a specific location in the hospital. A message about the client who is coming to the front desk to pay can be sent to all Front Desk computers instead of to a specific person who may, or may not, end up checking out that client. A message about a prescription refill can be sent to the pharmacy computer, or a message about the patient in surgery can be sent to the surgery workstation. This ensures that the workstation will get the notification and is not dependent on a specific person receiving the notification.
The exception will be when creating tasks or sending messages to a particular provider. In most instances, you would still want to send these to a specific provider instead of a workstation location.
Our Internal Messenger Setup document will walk you through how to create Staff records for each workstation.