Departments
- Amy Blanchard
Applies to: DVMAX v8.7 and higher
Purpose: This feature will provide your hospital with the ability to identify various service and/or product divisions in the practice and make them available for associating with recalls, staff and invoice line items, and using for reporting. This document outlines the steps necessary to configure the feature and how to use the feature in DVMAX.
Feature Overview
To use Departments, you will create new department records for any areas in the practice you want to identify as a separate area of business. For example, a hospital may choose to add departments for different specialties (Cardiology, Ophthalmology, Oncology, Emergency, etc), different species categories (Small animal, Equine, Exotic), or different income streams (Veterinary Services, Grooming, Boarding, Retail). After the departments are created, staff records are assigned a default department. As entries are added to a patient history or invoice, the department assigned to the Primary Provider on the invoice will be used for tracking and reporting. There is an option on the invoice to edit the department for individual line items.
Adding New Departments
By default, DVMAX has only one Department record, the hospital name, and this record is used anywhere Departments are employed. The hospital will need to add new departments to take advantage of the feature.
- From the Section pull-down, choose Patient Codes
- Search for Departments
- Click Add New
- Enter department Name (Example: Cardiology)
- Choose Color you'd like associated with this department (v8.8 and higher)
- Click OK to save the record
Complete steps 3-5 until all departments are added.
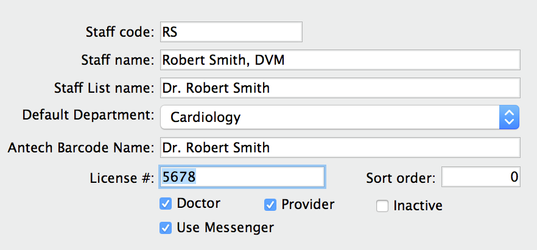
Assigning Departments to Staff
Each staff record will be assigned to a department. When items are added to an invoice, the department for each line item will default to the department assigned to that staff record.
- From the Section pull-down, choose Patient Codes
- Search for Staff
- Click All Records
- Double-click on a staff name to assign a department
- Select the Default Department
- Click OK to save the record
Assigning Departments to Appointment Columns
This feature is available in DVMAX v8.8 and higher and is used exclusively for our DVMAX/SmartFlow integration. (See>>> for more information about this integration)
- Open the appointment scheduler
- Click on Setup
- On the right of the Setup window, double-click on a Scheduler Staff
- In the left side of the Appointment Staff Information, choose a department from the Department pull-down
Invoicing and Estimates with Departments
Your hospital staff will not experience any change in workflow after the department feature is configured. Choosing the Primary Provider when opening a patient history or invoice/estimate will automatically start assigning charges to the default department configured in the Staff record. When viewing the invoice/estimate, you will see an extra column labeled Department.
![]() If you are not using the department feature, or do not have a staff record assigned to a specific department, the department column will list the hospital name.
If you are not using the department feature, or do not have a staff record assigned to a specific department, the department column will list the hospital name.

- If the Primary Provider at the top of the invoice/estimate is changed, all empty lines will show the new staff and the default department associated with the new primary provider. Invoice/estimate items already added will not change.
- If the staff code is changed on an empty line of the invoice/estimate, all empty lines will show the new staff and the default department associated with the new staff code.
- If the staff code is changed on a line item that already has a charge added, the staff code and department will change on that line only.
- The department can be changed for individual line items that have already been added to the invoice/estimate.
- If the department is changed on an empty line item of the invoice/estimate, all empty line items will be changed to the chosen department.
Reporting with Departments
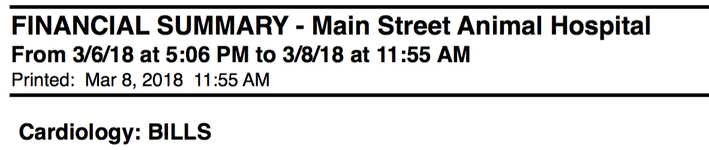
Transaction Summary Report
The Transaction Summary Report is now broken down by department. The financial summary section will divide income by department.
- From the Section pull-down, choose General Management
- Click on Reports tab
- From Standard Reports, choose Transaction Summary Report
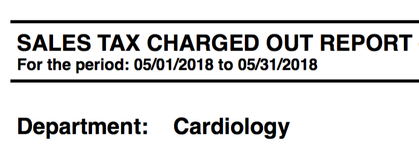
Sales Tax Charged Out Report
This report will now show sales tax charged out separated out by the department assigned to each line item.
- From the Section pull-down, choose General Management
- Click on Reports tab
- From Standard Reports, choose Sales Tax Charged Out Report
Recall Report by Department
This new report will group recalls by department. The department assigned to the bill item that generated the recall will be the department assigned to the recall. When manually adding a recall, the default department will be the department assigned to the current primary provider listed for the patient.
- From the Section pull-down, choose General Management
- Click on Reports tab
- From Custom Reports, choose Recall by Department. A page in your web browser will open.
- Enter date range for the report and click Generate Report
Departments When Saving Case Documents
In DVMAX v8.8 and higher, when saving a case document, you will now have to option to assign the document to a department. To save a protected document as a case document:
- Click Save; the Save dialog box will open
- In this window, you have the option to choose to associate a Department and a Visit to the document.
- Department - by assigning a department to the case document, you will see a small colored dot next to each case document to indicate which department is associated with this document. For more information on departments, you can view this document - Departments
- Visit - by assigning to a visit, you will be able to see these case documents associated with a patient visit in DVMAX Anywhere. For more information on DVMAX Anywhere, you can review the information here - Anywhere 2.0 (DVMAX v8.8 and higher)
- After you have assigned a department and visit (if you choose to do so), click Save as Case Document
- This will save a copy of the document with the same name as the protected document, and the date the document was saved
Departments in DVMAX Anywhere
In DVMAX v8.8 and higher, the department associated with each visit is displayed along with the patient visit information. When viewing a patient record, the overview screen has a section dedicated to past visits for the patient. If a department was assigned, it will be designated with a colored dot based on the color assigned during the department setup.